VIDEO/AUDIO RECORDING & EDITING
Page Navigation
- Instructional Technology
- Audacity
-
Audacity
Audacity is a "free, open source, cross-platform software for recording and editing sounds". Plano ISD currently uses Audacity version 2.1.1.
These instructions are for using Audacity on a desktop/laptop computer, not a Chromebook. For editing audio on a Chromebook, check out our WeVideo page.
For thorough instructions on how to use this program, visit their website: https://manual.audacityteam.org/index.html. Here are some basics to get started.
Open Audacity
The first time you use Audacity, you will need to install it from the App Depot. After that, you'll find it in the PISD Apps folder.
Save Project
Save the project in your H drive. Give it a descriptive name. In the examples below, it is called "PSA Project".
Record
Click the Record button to record audio (your voice). Then click the Stop button.

To listen to your recording, click once at the beginning of the blue sound clip, and then click the Play button (green arrow) on the control toolbar. You can start the playback of a sound file from any position along the sound wave. Just click your mouse at the point you want to start listening from. Also, you may want to hear only a certain portion of your sound clip. Do this by highlighting (click and drag) the portion of the sound wave you wish to hear and then clicking the play button.

Delete Unwanted Audio
Delete unwanted audio by using the selection tool
 to select the portion you wish to delete and press the Delete key on your keyboard.
Import Music
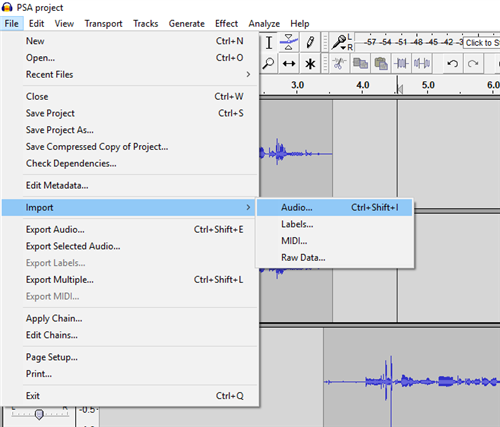
Click on File > Import > Audio. Locate the audio file that you have saved. If you need music, go to the section below.

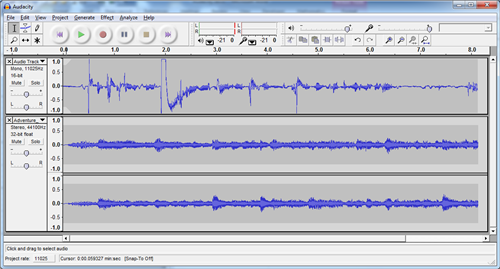
Your screen might look similar to the image below. (The first audio track is a voice recording; the second is imported audio.)

Need Music?
Sign into Webdesk.pisd.edu, add the "PISD Soundzabound" app, then launch the app. Search for the music genre and then download the one you like. Once you have downloaded the music, you can import the MP3 music file into Audacity following the directions above.
Reduce Volume of Background Music
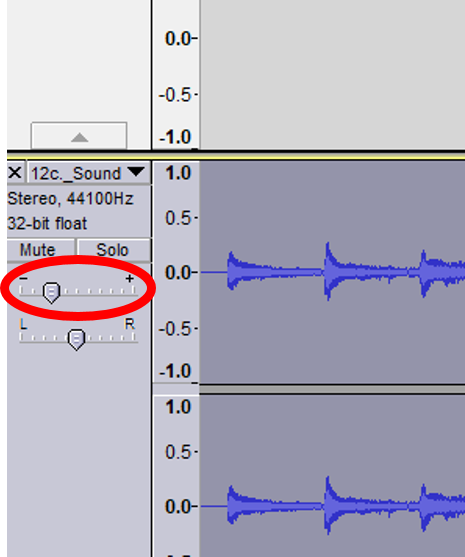
On the music track, move the slider toward the minus sign to reduce the “Gain dB” level.

Fade-In & Fade-Out
Using the selection tool highlight the first few seconds of the music track. From the menu, select Effect > Fade In.
Highlight the last few seconds of the track and select Effect > Fade Out.
Shift Tracks on Timeline
Use the Time Shift Tool
 to slide tracks around on the timeline.
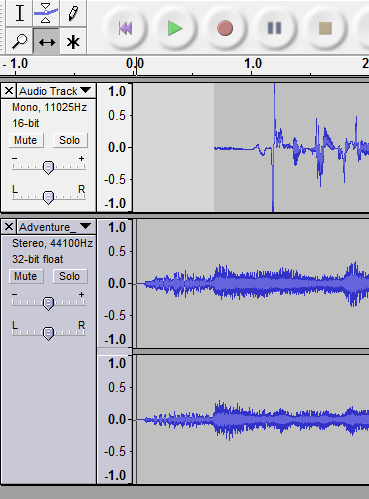
In the example here, the voice recording is moved slightly to the right so that the second audio track (background music) will start playing briefly before the narration begins.

Track Volume
The volume of a track can be reduced or increased by using the volume control for the specific track. Once the tool is selected, the blue lines above and below the track can be decreased to reduce the volume level.
Saving and Exporting
Audacity projects are stored with an .AUP file extension. You will save the file in order to be able to work with it later. You will also need to export the file so that it can be played with any device that recognizes MP3 files.
Save Audacity Project Files
- Select File > Save Project As…
- Give it a name and click Save.
Export as an MP3
- Click File > Export as MP3
- Choose a destination. Be sure to remember where you saved your exported sound file to so you can find it later.
- Click OK.
- You may choose to enter the requested information about the file, but you don’t have to.


