-
Zoom Premium for Teachers & Librarians
 Plano ISD has premium Zoom accounts for teachers and librarians. Look for the "Zoom (PISD)" app in your Webdesk. (Don't see it? Contact the Help Desk 28767). If you do not see "Licensed" next to your name in Zoom, follow these directions to activate your new premium account Instructions for Switching to PISD Premium Zoom Account See also "Zoom Premium FAQs" below.
-
Zoom Settings - initial setup
Open step-by-step instructions here: Zoom Initial Setup
-
How to get Zoom (install & sign in)
On a Desktop on the PISD Network
Get the most out of Zoom by installing the client version. Here's how:
1. Install Zoom from the App Depot located on your desktop.

2. YOU MAY OR MAY NOT SEE THIS POP-UP DEPENDING ON YOUR SETTINGS. During the installation, if you see this window, check “Remember my choice . . .” then click on Launch Application.

3. Once the installation is complete, click OK. A shortcut will automatically be added to your desktop.

4. Sign in with Google using your PISD credentials.
On a district-issued laptop
Option 1 - Desktop client version
Same as above however you MUST be on the network in order to install apps on the PISD network. So bring your laptop to work to install it.
Option 2 - Web version
Use the web version of Zoom by launching the Zoom app from Webdesk. Sign in with Google using your PISD credentials.
On your personal computer
Option 1 - Desktop client version
See instructions on the Zoom support page: https://support.zoom.us/hc/en-us/sections/200305583-Desktop
Option 2 - Web version
Use the web version of Zoom by launching the Zoom app from Webdesk. Sign in with Google using your PISD credentials.
On a Chromebook
To use Zoom on a Chromebook see these instructions on the Zoom website. See also our "Zoom Tips for Students" page.
On an iPad
Install the Zoom iOS app. Sign in using your PISD Google account.
-
Start a Meeting
Start a Meeting
Start a meeting right away or start a scheduled meeting.
Zoom on Desktop
1. Open the Zoom app from your desktop (install via App Depot).
2. Sign in with Google.
3. Click "Start Meeting", then "join with audio" to begin a meeting right away.

Zoom on Web
1. Open the Zoom app from Webdesk.
2. Sign in with Google.
3. Click on "Host a Meeting" on the top right.

Start a Scheduled Meeting on Zoom Desktop
Click on Meetings at the top, select the meeting you want under "Upcoming", then click Start.

-
Schedule a Meeting & Invite Participants
Schedule a Meeting
You can open either the Zoom desktop client (installed to your desktop via App Depot) or the Zoom web client (via Webdesk). See Scheduling a Meeting on the Zoom support page for more details on scheduling via the web.
1. From the Zoom desktop client (install from App Depot), click Schedule

If you're using the client version of Zoom, notice the message that your scheduling settings have been synced to the web portal. This means that if you open Zoom from Webdesk (or directly to Zoom.com) your meetings will be there as well.

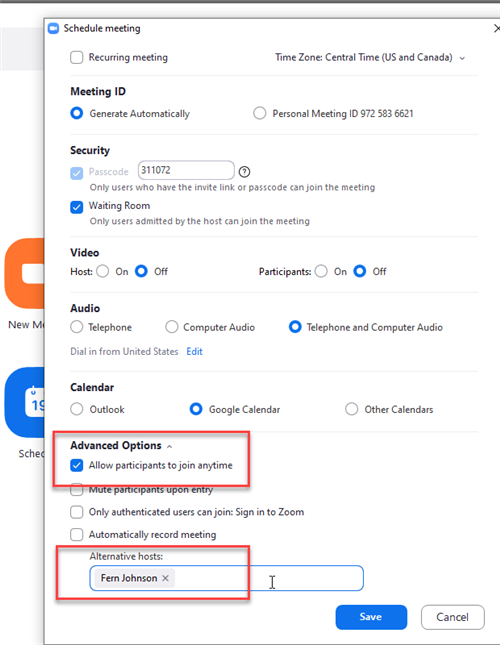
2. Scheduling options
- Topic: Enter a title specific to your Zoom session
- Date & Time: Enter date and time of the scheduled event
- Duration: Zoom Basic is limited to 40 min. It will cut you off after 40 min.
- Meeting ID: Generate Automatically or use Personal Meeting ID# (always use for instant meetings)
- Security: Enabling a waiting room adds a layer of security allowing you to monitor who to admit.
- Video: Leaving the video off for the Host and Participants disables the webcam from being turned on upon entry. Users can always turn this back on.
- Audio: Allow participants to join via Telephone & Computer Audio so they have options.
- Calendar: We suggest selecting Outlook so that you can easily invite participants via the calendar invite. The Outlook invite will pop up after you save the Schedule Meeting settings.
- Advanced Options: Make the selections based on your preferences. For example, if you're conducting a training to a large group, you might want to disable join before host and enable mute participants upon entry.
- Don't forget to Save!

If you chose to connect to a calendar, you will be prompted to sign into that account and it will open your calendar settings. This is where you can invite participants to the meeting. Or you can copy and paste the join link to an email. See more below.
Invite Participants to the Meeting
Invite participants either by copying the join link and emailing your participants or via the calendar event. Please do not post the URL to a published website as you might receive unwanted guests.
Email Invite
1. Click on Meetings
2. Copy Invitation

3. Open your email, paste the invitation information, enter the participants' email addresses, then Send.

Calendar Invite
If you chose to connect to a calendar in the Zoom Meeting settings, you will be prompted to sign into that account and it will open your calendar settings. This is where you can invite participants to the meeting.

On the Zoom web client, you can open the scheduled meeting and select the calendar in which to create a meeting event. Notice you can copy the meeting invitation to email participants here, as well.

- Topic: Enter a title specific to your Zoom session
-
Join a Meeting
Zoom linked in email
- It is likely that the meeting moderator sent you an email with the Zoom meeting link embedded in it. Open that email, click on the link, and Zoom will load for you. Be sure to have followed the Zoom installation steps above.
Meeting ID
- If you do not have the meeting hyperlink in an email but you do have the Meeting ID, then you can:
- Launch the Zoom app from your desktop.
- Click "Join a Meeting".
- Enter the meeting ID given to you by the moderator.
Tip
- If you join a meeting in which you would like to only be a viewer and not verbally participate, check the boxes to turn off audio and video when joining the meeting.

-
Hosting
The "Host" is the person who schedules and potentially starts the Zoom meeting. Here are options for sharing Host duties.
- If someone needs to start the meeting before the host, you can check the option for participants to join anytime.
- If you would like to provide alternative hosts to the meeting, you can add their email address to the option, however, if you are a licensed user, you can only add other licensed users (not basic account holders). Zoom page: Assign user(s) in your account to schedule meetings on your behalf.
- You can start the meeting as the host and then make another teacher the host, then leave the meeting.
-
Live Meeting - adjusting Zoom settings
Adjusting Zoom Settings During a Live Meeting
Chat Window
- You can change who participants can interact with in Chat. Open the Chat window and click on the three dots. Participant Can Chat With:
- No one
- Hosts and co-hosts
- Everyone
Choose the appropriate chat setting for the learning activity at any time during the live meeting.
- Send a private message. Click on the dropdown box located in the bottom left corner after the word To:.
- Everyone loves emojis! Hosts and participants can click on the greyed out smiley face to communicate with an emoji. (If you don't see it, be sure to enable it in your Zoom Settings beforehand).
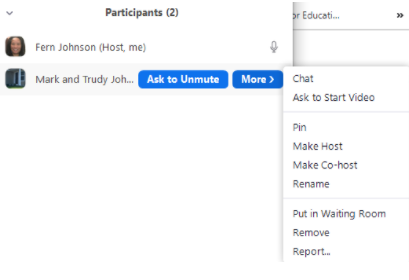
Participants Window
- Control the interactivity of your live session. Click on the three dots to open the following choices:
- Ask all to Unmute
- Mute Participants Upon Entry - this should be the default if you enabled this in Meeting Settings.
- Allow Participants to Unmute Themselves - Make sure this is NOT checked as the default.
- Allow Participants to Rename Themselves - attendance might be difficult is this is checked
- Play Sound When Someone Joins or Leaves - This will alert you if a participant leaves the meeting.
- Enable Waiting Room - Keep track of who is allowed in your meeting.
- Lock Meeting - Keeps new participants from joining the meeting.
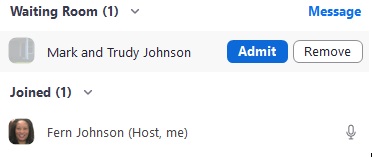
- Waiting Room - Admit all your students at the same time by choosing “Admit All”. You can also send a message to students who are in the waiting room. Remind participants to write their first and last name as their screen name before you admit them to the meeting.
- More Menu - Hover over a participant’s name to select specific action items applicable only to that participant.
-
Tips for Students
See the "Zoom Tips for Students" page on the left navigation pane.
-
Breakout Rooms
Using Breakout Rooms
Note: Only a Host or a Co-host has the ability to apply breakout rooms. Once breakout rooms have started, the host/co-host has the ability to jump in/out of any room. Watch the video below to see how to broadcast a message and set timers.
1. First, enable breakout rooms by going to your Settings and turning it on.

In Settings, scroll down to find "Breakout room" and turn it on.

2. When you start a meeting, you will see the Breakout Rooms option on the bottom of the meeting screen.

3. Select how many rooms in which to place the participants, either automatically or manually.
Another option is to pre-assign them - How to pre-assign breakout rooms.
Video on creating breakout rooms
-
Captions
Automated Captioning
Follow these directions to enable captioning in Zoom: Enable Captions in Zoom
-
Recording
Recording & Saving Live Instruction
See our step-by-step guide on Recording Live Instruction.
The Zoom support page may also be helpful: https://support.zoom.us/hc/en-us/articles/201362473-Local-recording
-
Best Practices
10 Ways to Secure Zoom

Best Practices for Securing Your Virtual Classroom
https://blog.zoom.us/best-practices-for-securing-your-virtual-classroom/
-
Zoom on Chromebook VS. Windows/Mac
-
Zoom Support
- Best Zoom Shortcuts for Teachers (from Tech & Learning)
- Visit the Zoom support page for instructions and videos on how to use this platform
-
Contact the Digital Learning Team - pisd.edu/dlt
-
Zoom Premium FAQs
Frequently Asked Questions
Q: What's the difference between a Basic Zoom account and a Premium Zoom Account?
A: These new licenses offer greater functionality than the basic (free) accounts many of us have been using since remote teaching and learning started (Spring 2020). Among the enhanced features are cloud recording, dial-in phone numbers, increased participant capacity (300) and Single Sign On through Webdesk. Coupled with Zoom’s advanced noise-cancelling technology, break out room capability, and enhanced in-meeting management features (e.g. Mute All, Disable Chat, etc), we believe this tool is a welcome addition to our instructional technology toolbelt.
Q: Does this mean we can no longer use Google Meet?
A: Google Meet will remain available and viable for a variety of purposes. We love the convenience of Meet’s integration with Google Classroom. Google will soon (Fall 2020) place some limits on our version of Meet that may prevent it from being the most appropriate solution in some circumstances. Notably, all recordings made in our version of Meet will be given a “temporary” designation. They will expire in 30 days, can’t be downloaded and may not be shared outside of the organization. Those limitations may be OK in some cases, but not in others. Google is also making noise cancellation part of it’s premium package (that we don’t have), reducing participants to 100 (from 250) and will no longer be providing dial-in numbers for meetings.
-
Install Zoom from App Depot

Having issues with sound while on a work computer? Be sure to install the Zoom app from the App Depot.
Detailed instructions are in the section "How to get Zoom - install & sign in" below.
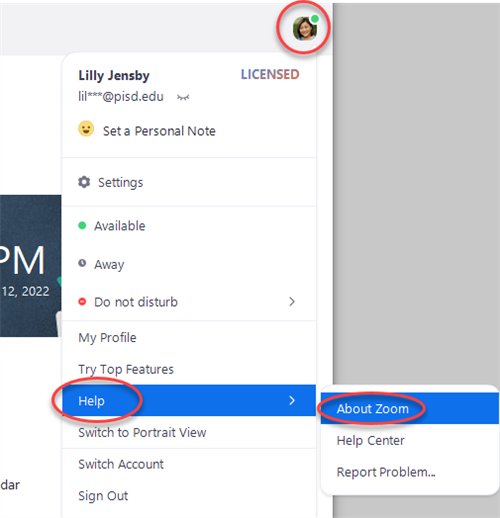
Update Zoom
Make sure you have the most updated version of the Zoom app on your desktop. To find the version number, tap on profile > Help > About Zoom. If on a district laptop, you'll need to update via App Depot while on the network.