
-
How to Log In - Teachers & Students
1. In Webdesk, launch the app titled "PISD Savvas". It should already be on your home screen and also in your MyClasses.
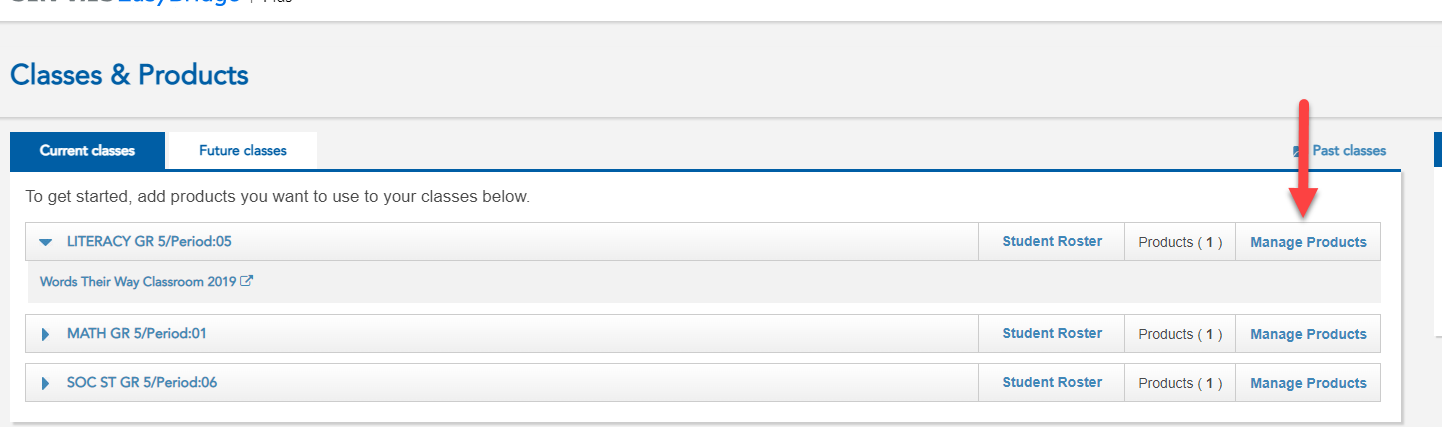
2.💡Teachers: Be sure you have added products to your class(es). Click "Manage Products" in Easy Bridge to select the content for your class. Follow the directions "Getting Started - Adding Products" for assistance.
-
How to Log In - Specialists, Admin, PACE, Assistants, Substitutes
1. In Webdesk, launch the "Savvas Realize (Specialists)" app for elementary staff or "Savvas Realize Secondary" for secondary staff. If you don't see it, go to Step 2. This is a view-only access for educators with no students assigned to them in the Skyward. Staff members do not sign in for this view-only access. They also cannot assign content to students or edit/remove content.


2. If you don't see this app on your home screen, you can add it from the App Library. Click on the plus sign on the top left to open the App Library. Click on "PISD Staff". Then click "Add" under the Savvas Realize (Specialists) / Savvas Realize (Secondary) app.


3. It will autofill with a district created username and password so you will NOT have to type anything. Simply wait for the fields to be populated. After it autofills, click Sign in.

Doesn't work on the iPad
Specialist apps - HMH Specialist & Savvas Specialist - will not work on iPads. It needs the One-Click Classlink Chrome Extension to auto sign in which iPads do not have. Alternatively, access what you need from your computer. If you need to present it from the iPad, download what you need (like the PDF) from the website on your computer into Google Drive. When on the iPad, open it from Drive and mirror to the Apple TV.
-
Getting Started - Adding Products
1. In Webdesk, launch the app titled "PISD Savvas". It should be already on your home screen.

2. Add your courses one at a time by clicking on the Manage Products buttons on the right side of the Classes box. Select only Math, Social Studies, Science or English.

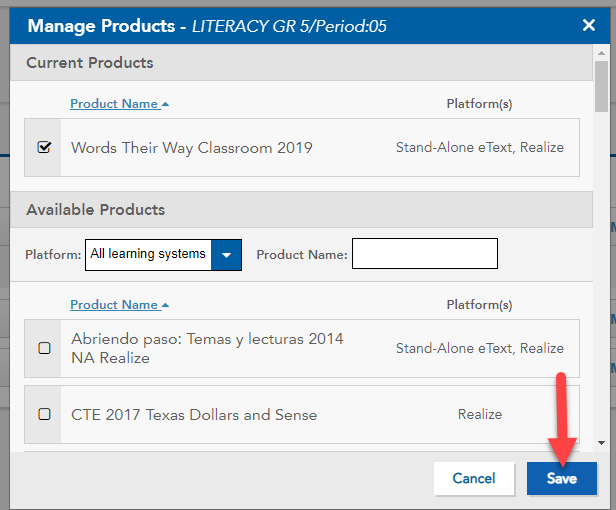
3. When you select a course, the window appears to Add Products. Click on the textbook for the course you selected. Click Save. Do this for Math, Science, and Social Studies.4. Once you have selected all the books you wish to use, click the Realize button on the right. You are all set!
*** However, if you are new to SAVVAS, continue to steps 5-11.
5. In the section "What grades do you teach?", select the grade you teach and scroll to the next section.
6. In the section "What programs do you teach?", select the programs you want to access. Please do not select above-grade level books. You may select more than one grade level. This can be changed later. Scroll to the next section.
7. In the section "What is your name?", type your name in the box. This is the name your students will see. Scroll to the next section.
8. In the section "Pick a profile icon", select a profile icon and scroll to the next section.
9. In the section "Pick a background image for your homepage", select an image and scroll to the next section.
10. Check the box to agree to the license agreement and click "Let's go!"
11. On the next screen, click Programs on the menu bar or the number one button to see your textbook resources. Click Classes on the menu bar or the number two button to check your class roster(s). Your classes are automatically created from Skyward.
-
Changing Content
Have you moved grade levels? Are you teaching a different subject? If you’ve already set up your Savvas Realize account and need to change the content, follow the directions below. If you have never set it up, follow the Getting Started directions.
1. In Webdesk, launch your PISD Savvas app. If it doesn't let you log in, please email your friendly Digital Learning Team - pisd.hotspot@pisd.edu.
2. Click the profile button on the top right and go to Settings.
3. Click “My Programs” and check the boxes next to what curriculum you need.
4. Click Save.
-
Removing Content
Don't want to see content to classes that you no longer teach? It doesn't hurt to leave it there, but if it bothers you, follow these directions.
1. Launch the PISD Savvas app from Webdesk.
2. At the EasyBridge screen, click Manage Products and uncheck the boxes for the material you no longer need. Be sure to click Save.
-
Annotating in Savvas
Students can use some basic tools to edit a worksheet in Savvas and save their work.
See these instructions to walk you through the options: Annotating in Pearson (now Savvas)
Also included in the slideshow above is using Kami to editing. See our Kami page in the Hotspot: www.pisd.edu/kami
-
Log In Issues & Support
Login Issues?
Can't get into your digital textbook resources? Try the following:
- Double-check that you have the correct tile installed on Webdesk.
- Be sure that you are using Google Chrome as your web browser.
- Check that you have the Classlink OneClick extension installed from the Chrome Web Store. Installation link
- Clear your cache in Chrome. Instructions
- Update the LDAP (verify password) in Webdesk. Instructions
If none of the above works, have your CTA create a help desk ticket for "Online Textbook" issues.
Trouble Connecting with Google Classroom?
See section below on "Connecting your Google Classroom".
Savvas Technical Support
See "Product & Technical Support" on the Savvas website: https://support.savvas.com/support/s/k12-curriculum-support-form
-
Connecting your Google Classroom
Step-By-Step Getting Started Google Classroom and Realize PDFs
Teacher creates Google Classroom and adds students.
How students join Google Classroom Classes (student view).
Teacher verifies student joined Google Classroom Class.
Import a Google Classroom Class to Realize.
Create Realize assignments for your Google Classroom classes.
Student launches Realize assignment from Google Classroom.
Teacher verifies the student has Google Classroom and Realize synced.
Experiencing Errors or Problems Connecting?
Student: Connect Savvas to Google Classroom
Student error: Account Already Linked
Email DigitalLearningTeam@pisd.edu and include Student Name, ID#, Campus, Teacher, Class name and a screenshot of the error message, if possible.