Microsoft 365 (Word, Teams, Outlook, etc.)
Page Navigation
- Instructional Technology
- Outlook Email
-
Outlook Email
-
⚠ District Email Guidelines
PISD Communications Department - https://www.pisd.edu/email
-
Outlook on Windows 10 - Install
1. Open the Outlook shortcut on your Desktop.

2. It will launch a dialog box to welcome you. Click Next.
3. Select "Yes" under "Do you want to set up Outlook to connect to an email account?" Then click Next.
4. Enter your email address and click Next.
5. At the Windows Security message, remove the "ad" from your email address, enter your password, check the box next to "Remember my credentials", and click OK.
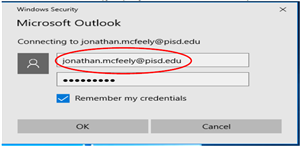
6. In the next screen, click Finish. Your email will open.
Need Help?
Please contact the Help Desk at extension 28767.
-
Outlook Online - Access
1. Login to webdesk.pisd.edu
2. Click on the Microsoft 365 app or the Outlook app (if you don't have it you can add it to your Webdesk by clicking the plus sign and searching for it).
3. Sign in with your PISD email address and network password (Webdesk will remember this information after you log in for the first time).
4. If opened with Office 365, click on the Outlook button.
-
Outlook on Mobile Device - Set up
Set up the Office app and Outlook on iOS devices (iPhone/iPad): Follow these instructions
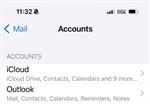
Add the Outlook app on your iOS devices: Follow these directions
Android devices: Follow the instructions from Microsoft
-
😎 Adding Emojis
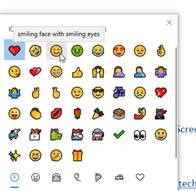
Add an Emoji to an email by pressing the keyboard combination Windows key and period. Note: It works best on Outlook online (Webmail).

-
Creating a Contact Group
Follow the steps on the Microsoft Outlook support page: Create a Contact Group.
-
Creating Folders and Rules
Create a Folder/Subfolder
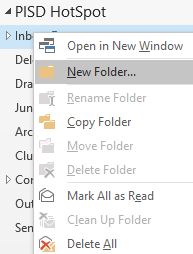
To create a folder, right-click on Inbox (under Folders) and click Create new subfolder (Outlook online) or New Folder (Client)
Create an Inbox Rule:
For Windows Client Version (Desktop/Laptop) inbox rules, click on this link for step-by-step instructions.
For Outlook.com or Outlook on the web, click on this link for step-by-step instructions.
-
Delay Delivery / Schedule a Message for Later
Online version - "Schedule send"
Click on the dropdown next to send, select Schedule Send.
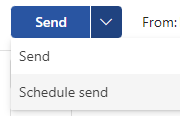
See instructions on the Microsoft Support page for step-by-step instructions. Once the email is scheduled, Outlook does NOT need to be open for this message to be delivered.
Client Version - "Delay Delivery"
*IMPORTANT: Emails can only be sent and received when Outlook is running. If Outlook is closed at the delivery time that you've chosen, the message will be sent the next time you open Outlook.
1. Compose a New email.
2. Click on Options at the top, then select Delay Delivery.

3. Select "Do not send before" and enter the date and time you wish for the email to be sent. Then click Close.
4. Email can be found in your Draft folder until it is sent (edit to send immediately).
See instructions on the Microsoft Support page for step-by-step instructions.
-
Email Archiving
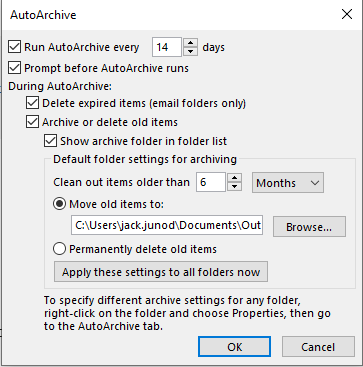
Set up your Outlook to auto-archive your emails every 6 months (or your preference) to keep your email cleaned up. Note that you can also set this up by folder.
1. Click File > Options > Advanced.
2. Under AutoArchive, click AutoArchive Settings.
3. Click the Run AutoArchive every n days. box and specify how often to run AutoArchive.
4. Choose any other options you want, such as having Outlook delete old items instead of archiving them.
-
Email Etiquette (Dos & Don'ts)
Dos
- 4Ds! Do, Delete, Defer, Delegate (Article)
- Read your message before you send it.
- Make your subject descriptive and action-oriented. Use prefixes such as FYI: and Action Required.
- Change the subject of the message if the topic of the conversation changes.
- Keep all messages short and to the point.
- Organize the content of your message from most important to least.
- Consider bolding important information.
- Put action items or questions on separate lines so that they stand out and get noticed.
- Bold people's names when asking questions. For example: “Ryan: What is the status of the project?
- Limit the number of people to whom you send a message to those who need to read it.
- Put people who need to be informed on the Cc line.
- Put people who need to respond or take action on the To line.
- Use a signature when appropriate, but keep your signature simple, short, professional, and if possible, free of graphics.
- If you want an immediate response, don't send a message. Phone or send an instant message.
- Use High Importance sparingly.
Don’ts
- Don't use stationery.
- Don't include your manager on every message you send.
- Don't send a message when you are angry. Better to write it, save it to your drafts folder, and come back to it later.
- Don't expect a quick response when sending long messages (more than two paragraphs).
- Don't send a follow-up message less than a day after the first message.
- Don't use read receipts or delivery receipts on every message you send..
- Don't use ALL CAPS.
- Don't expand distribution lists. Expanding distribution lists makes messages harder to read and causes them to go into the wrong mail folders for people using rules.
- Don't use sarcasm. Your humor might be misunderstood.
- Don't write something you wouldn't want everyone in your company to read. You never know where your message might end up.
- Don't use cursive or "funny" fonts that are hard to read.
- Don't use red fonts, because they are hard to read and can be interpreted as being critical.
- Don't use Reply All to a Contact Group asking to be removed. Ever.
Adapted from “Best Practices for Outlook” on support.office.com
-
Install Google Drive Desktop on Desktop/Laptop
Google Drive Desktop
Install Google Drive Desktop to access Google Drive from your Windows Explorer Files. This is only available on Desktops or Laptops. It is not available on Chromebooks.
Installing:
- Click on the App Depot tile on your Windows Desktop dashboard.
- In the Search bar (top right), search for Google Drive Desktop (it may be on the Applications page when you open App Depot).
- Click on the image, then click Install
Accessing from Windows Explorer:
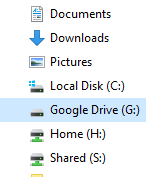
- Click on Windows Explorer Files folder
- Click on Google Drive (G:)
- Click on My Drive
Accessing from Email:
- Open an email with an attachment.
- Click the arrow on the attachment and select to save to Google Drive.
Troubleshooting:
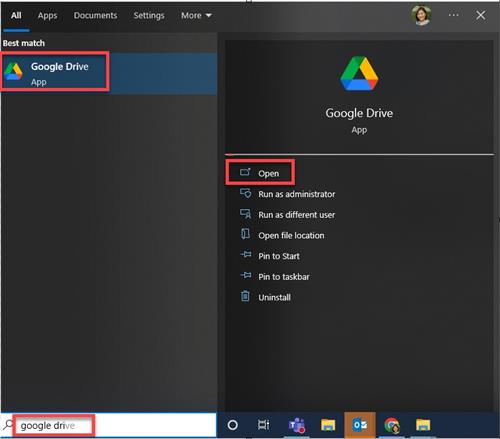
If Google Drive (G:) no longer appears in your Windows Explorer Files folder, follow these steps to open Google Drive Desktop app.
- In the Windows search bar at the bottom left of your desktop/laptop, enter "Google Drive"
- Select the Google Drive app, and click "Open"
- Check to see if the Google Drive app icon appears in the lower right corner of screen.

-
⭐ Outlook Productivity Hacks
Helpful Articles
⭐ 6 Best Outlook Hacks You Need to Know in 2022 ⭐
Best Practices for Outlook (Microsoft support)
Productivity Hacks:
Drag and Drop Emails
Drag and Drop emails to create Calendar Events, New Contact, or Task:

*** In Office 365 (web version), click on My Day to open panel. Drag and drop email to the calendar section or to the task section to create a new entry.

Keyboard Shortcuts for Client Version (Desktop/Laptop)
- CTRL N - Create a new email
- CTRL D - Delete email
- CTRL F - Forward email
- CTRL R - Reply to email
- CTRL U - Mark as Unread
- Space bar - Speed Read email and jump to next email
AI Supported Tool
😆Turn spicy thoughts into classy ones - https://goblin.tools/Formalizer
-
Recall an Email
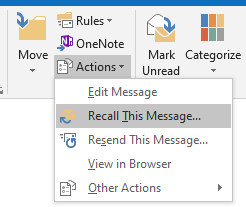
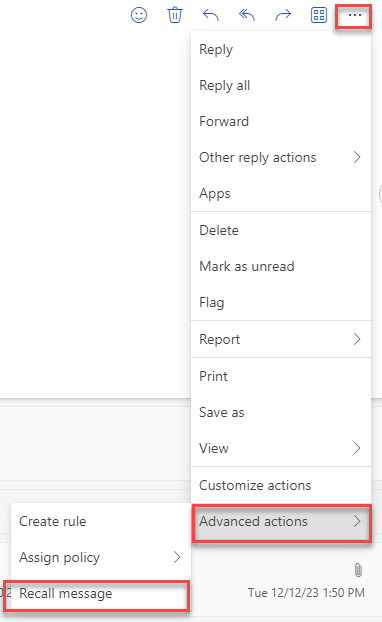
In your sent folder, double-click on the email you want to retract to pop it into it's own window.
For Outlook Client: Click the Actions dropdown and select Recall This Message.
For Outlook online: Click on the 3 dots, select Advanced actions at the bottom, and then select Recall message.
View the Microsoft Support page, click this link to see the video and step-by-step instructions.
-
Student Email (Gmail)
- Student email is on for Grades 6-12.
- The email address is username@mypisd.net
- It's in Gmail, not Outlook.
- Learn more on the Student Email page.
-
Templates
In Outlook Client
View Template
- Open a new email.
- Click on View Template from the ribbon.
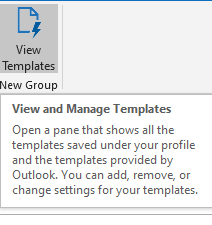
(Image above) View and Manage Templates - open a pane that shows all the templates saved under your profile and the templates provided by Outlook. You can add, remove, or change settings for your templates.
Don't see View Template?
If you do not see View Template in a new email, follow these directions to add this option to the ribbon.
Right-click the ribbon, choose Customize the Ribbon. Follow these steps that correspond with the image below.
1. Choose "All Commands"
2. Scroll down to "View Templates" and click on it.
3. BEFORE you click Add, you have to create a new group in New Mail Message. So click on New Mail Message, the...
4. Click New Group (you can name it Templates if you want)
5. Click on this New Group that has been added and select the "Add>>" button. Then click OK.
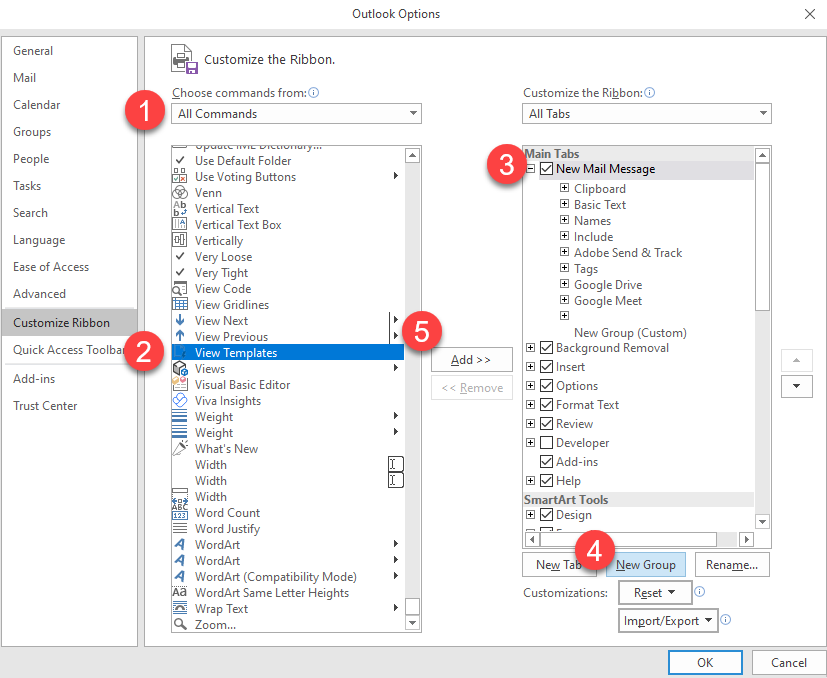
Now, you will see View Template on the ribbon in a new email.
In Outlook Online
- Create a new email.
- Click on the Pop-out button (circled in image below).
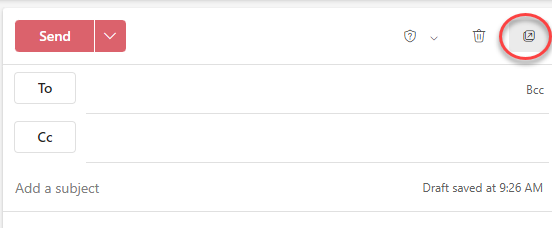
- On the Message ribbon you will see the Templates button.

Saving a Template with Attachments
Client: View instructions here: https://www.ablebits.com/office-addins-blog/create-outlook-email-template-with-attachments/
Outlook Online: It is currently not possible to add an attachment (Reference). HOWEVER, you can upload the file to Google Drive, copy the share link, and hyperlink the text inside the template.
-
Email Etiquette
- Include Call to Action in subject line
- One email thread per topic
- Manage recipients
- Start with main point
- Summarize your reply
- Hyperlink whenever possible
- Reply NOT reply all
- (Doesn't apply to Outlook)


