Tips & Tricks
Page Navigation
- Instructional Technology
- Website Editor - Tips & Tricks
-
Website Editor Tips & Tricks
Below you will find tips to aid you developing your webpages. Feel free to submit suggestions for tasks that you feel should be added to the list to websupport@pisd.edu.
Tips & Tricks
-
Calendar - Hide Google Contact Information
Place an embed code app on your calendar page.
Copy the following code in the embed code.
<style>
.wcm-eventdetail-contact {
min-width: 200px;
visibility: hidden !important;
}</style>
-
Calendars - Syncing with Google Calendar
Google Calendar Sync Guide
Google Calendar Integration Limitations
(excerpted from the guide above)
Here are some limitations to Google Calendar Integration.
- A Calendar App can only be synced with a Google Calendar that has been made public.
- When deleting a single occurrence of a recurring event in a Calendar App, the event will not be removed in Google Calendar.
- Editing a single occurrence of a recurring event is only available in Google Calendar.
- If a Google Calendar is in a different time zone from the Calendar App, it will yield unfavorable results. If you switch the time zone for a calendar that is already synced, it will still use original time zone.
- A Calendar App will not automatically refresh if an event is added in Google while viewing the Calendar App. You will need to manually refresh your Calendar App.
- Google Calendar End On and the Calendar App End On dates are handled differently for recurring events. The Calendar App does not include the last date, while Google Calendar does.
- Google Calendar supports recurring events without an end date. Google Calendar recurring events without an end date are not pulled into a Calendar App.
- Yearly Recurring Events from Google Calendars are pulled into a Calendar App. Google Calendar Events with a yearly occurrence greater than one year are not pulled into a Calendar App.
- We Community Manager calendar events that are role protected or pushed from other calendars will not be pulled into Google Calendar.
- Web Community Manager calendar events synced from Schedule Star and assignments that have been posted from an Assignments App will not be pulled into Google Calendar.
- Recurring events that have been imported into Google Calendar will not be pulled into a Calendar App.
- When you initially sync a Calendar App and a Google Calendar, only events from that day forward will display on the targeted calendar.
- Creating, editing and deleting recurring events is only available in Google Calendar if you are using Sync Both Ways Google Calendar Integration.
-
Content Accordion
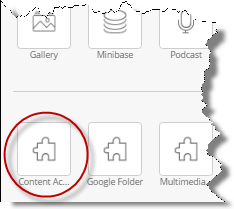
- Add a Content Accordion App to your page
- Drag the Custom Content Accordion to your page.
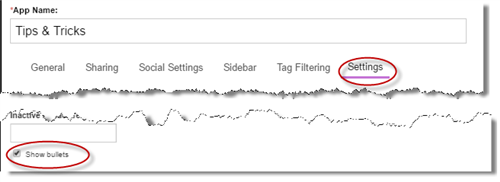
- Set app options to make the bullets work
- Select 'App Option'
- Click 'Settings'
- Check the 'Show Bullets' Box
- Click Save
-
Content: Images - Alignment
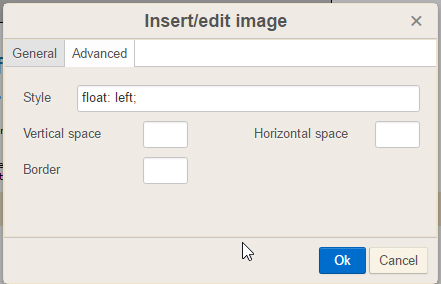 Image Left of Textfloat: left;Image Right of Textfloat: right;Distance between Image and Textmargin-bottom: 10px;
margin-right: 10px;margin-left: 10px;margin-top: 10px;For all marginsmargin:10px; -
Content: CallOut Box
Using a content app, place the following code in the HTML Editor.<p><strong><span class="color_background_plano" style="font-size: large;">Contact Us</span></strong><span class="color_border_plano">some text here<br />some text here</span></p>
Contact Ussome text here
some text herePut a link in the Title (remove blue link color)1. Create your link.2. Edit Code3. Find the link '<a' tag.4. Copy following text to make the text white again: style="color: #fff;"<a style="color: #fff;" href="https://fans.pisd.edu/fma" target="_blank"> -
Content: Headings
Note: you first select which heading size you want, then the formatting option.
Heading options:
Title (H1) Example
Sub-Title (H2) Example
Heading (H3) Example
Sub-Heading (H4) Example
Formatting options:
Site_color: (set in Template, usually site's primary color
Color_border_plano
Color_background_plano
Two_tone_color_background
-
Content: Linking Documents
Upload documents in pdf format to Files & Folders in Tools tab.
At the far right of item uploaded is a More button.
Click to get drop down options.
Select Get Link.
Copy the Relative Web Address (Control + C). Close window.
Return to where you want to link the document.
Highlight text, right click, choose Link, then Paste (Control + V) copied address into Url box, click OK.
-
Content: Remove default editor formatting
Remove default editor formatting
1. Highlight the text for which you want to remove formatting.
2. Press the template styles button. You can clear multiple formats at one time.

Works on most of the editor default styles.

- Bold, Italics, Underline, Strikethrough, and default header styles and font color
-
Directory: Filters - How they work
The directories displayed throughout campus sites are filtered from the contact directory found on the campus Contact "PESH Staff Directory" page.
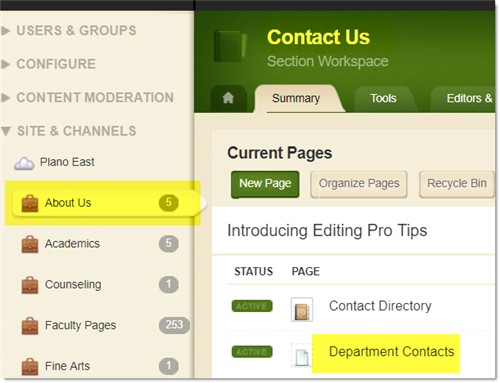
- Each filtered directory is managed from the Department Contacts page found in the 'About Us' channel and the 'Contact Us' section.
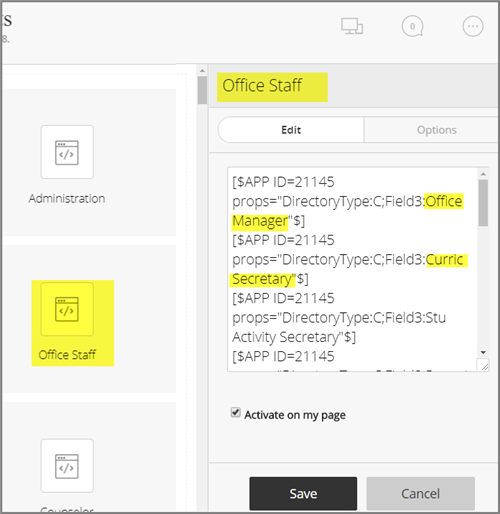
- The Embed Code apps on this page contain the filters for each department/academic directory. The directories are filtered on 'Department' field (Field3 in the embed code) from the Campus Staff Directory. So, the Department field for each staff member must match one of the filtered Department names in the filtered directory for the staff to display on a specific department/academic directory.
- Multiple filters can be included for each filtered directory.
- Example Filter:
There are no records to display.
- Example Filter:
- Multiple filters can be included for each filtered directory.
- Each filtered directory is managed from the Department Contacts page found in the 'About Us' channel and the 'Contact Us' section.
-
Directory: Linking Teacher Pages
You will need the domain number or page number from each staff member's website. It will be found in the URL address bar on the teacher page. "https://www.pisd.edu/Domain/1469"
The bold item is the domain for a teacher’s individual page in the Faculty Pages channel. Paste the domain/### into the Link field in the Contact Directory
minibase app.Example:
Domain/1469 or Page/1200
Paste the code into the Links field in the Contact Directory mini-base app. Change the Domain number to correspond with the appropriate Teacher. Remember to Save changes.
'Easy' way to do this is to export your Contact Directory, paste the text into the Link column, make changes, save new directory (must be in CSV format). Purge the old directory (download and save a
back-up copy of the file first--keep it as CSV format), and import the new directory with the link codes. -
Directory: Updating Campus Staff Directory
Where to edit the directory
- Video - Find the directory
Helpful TIPS
Staff Member Leaving - I know the replacement information
- Edit old staff member information in the directory. Replace the name, email, phone # and link.
Staff Member Leaving - I DO NOT know the replacement information
- Find the staff member in the directory. Delete the contact. IMPORTANT - take note of the existing information. Especially the department. The department field is used to filter and display the correct contact information throughout the website. You will want to use the same department for the new staff once known.
-
Embed a Google Slides
Embed a document, spreadsheet, or presentation
- Open a file in Google Docs, Sheets, or Slides.
- At the top, click File > Share > Publish to the web.
- In the window that appears, click Embed.
- Choose a publishing option:
- Spreadsheet: Choose to publish the entire spreadsheet or individual sheets.
- Presentation: Choose a presentation size and how quickly to change the slides.
- Click Publish.
- Copy the HTML in the text box and paste it into an embed code app.
-
Embed a Google video on webpage
- Open Google Drive
- Find theVideo file and double click
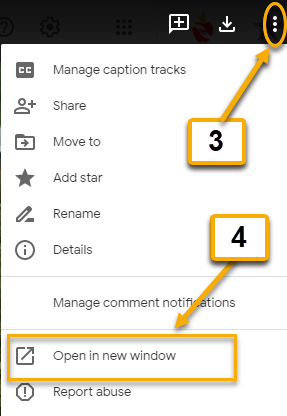
- Click the"More Actions" icon (3 vertical Dots) upper right corner
- Select "Open in New Window"
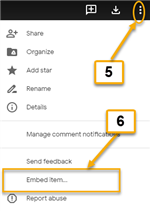
- Click "More Actions"
- Select “Embed item…”
- Copy Embed Code
- Paste into Embed APP
-
Embed Code for a Responsive Video
For a responsive video,
- Insert an Embed Code app on your page
- Copy and paste the following code on the page
- Replace the red text with your video link.
<style>.embed-container { position: relative; padding-bottom: 56.25%; height: 0; overflow: hidden; max-width: 100%; } .embed-container iframe, .embed-container object, .embed-container embed { position: absolute; top: 0; left: 0; width: 100%; height: 100%; }</style><div class='embed-container'><iframe src="Your video link goes here" frameborder='0' allowfullscreen></iframe></div>
-
Embed Video on web page
All video must be closed captioned.
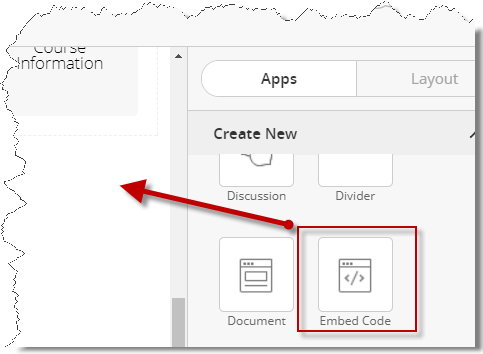
- Drag the Embed Code App onto your page.
- On a computer, go to the YouTube video you want to embed.
- Under the video, click
Share . - Click Embed.
- From the box that appears, copy the HTML code.
- Paste the code into your blog or website HTML in the embed code app.
-
Files & Folders: Uploading Documents and Photos
You need to be in the Section in which you want to use the document or photo. Next to the Summary tab at top of editor is a Tools tab.
Click on Tools tab.
Select Files & Folders from the list.
New window opens. (You can create subfolders if you need to organize a lot of items for the site.)
Click on green Upload button.
Drag and drop desired files into the box. You can select multiple items to drag together. Be sure file names do not include invalid characters; i.e. parenthesis.
Click black Upload button at bottom LH of window. A list of all uploaded files will now appear in the Upload window.
See Linking Documents for further information.
-
Guidelines: Accessibility
The PISD websites are accessed and used by a diverse group of people. Some of our users, including students, parents and employees, have visual or hearing impairments that create challenges in accessing websites and require the use of assistive technologies such as screen readers and text-only browsers. -
Guidelines: Style
The Plano ISD website uses a stylesheet—a set of instructions that helps manage the way text displays on a website—to ensure that all pages are created using similar fonts and styles. While many font choices, sizes, styles and colors are available, users are encouraged to maintain template defaults. it is a goal to keep the style sheets as clean as possible and to maintain consistency between all pages on the site.View the PISD Style Guide.
- Use the H1_Plano Style as the title of each page.
- Do not underline text.
- Documents MUST be accessible by people with disabilities.
- No animated GIF
- Do not change default font colors
-
Images: Create Chalkboard Image
Need a image for Region C ›Headlines & Features App on the homepage? Create a chalkboard image in about 3 minutes with the poster my template for free.
RECOMMENDED ACCENT IMAGE DIMENSIONS: 587PX X 486PX
Image editor for Accent Image -
Images: Photo Dimensions (Home page)
LARGE ROTATOR PHOTO DIMENSIONS: 1500PX X 915PX
Image editor for the large rotatorSMALL ROTATOR PHOTO DIMENSIONS: 1123PX X 618PXRegion C ›Headlines & Features or Any App
RECOMMENDED ACCENT IMAGE DIMENSIONS: 350PX X 290PX
Image editor for Homepage Headlines & FeaturesImage editor for Campus Spotlight 579PXx479PX
Region D › Any App Region E › Any App
Region F ›Headlines & Features or Any App
RECOMMENDED ACCENT IMAGE DIMENSIONS: 587PX X 486PX
Region G › Any AppRegion H ›Headlines & Features or Upcoming Events
RECOMMENDED ACCENT IMAGE DIMENSIONS: 350PX X 290PX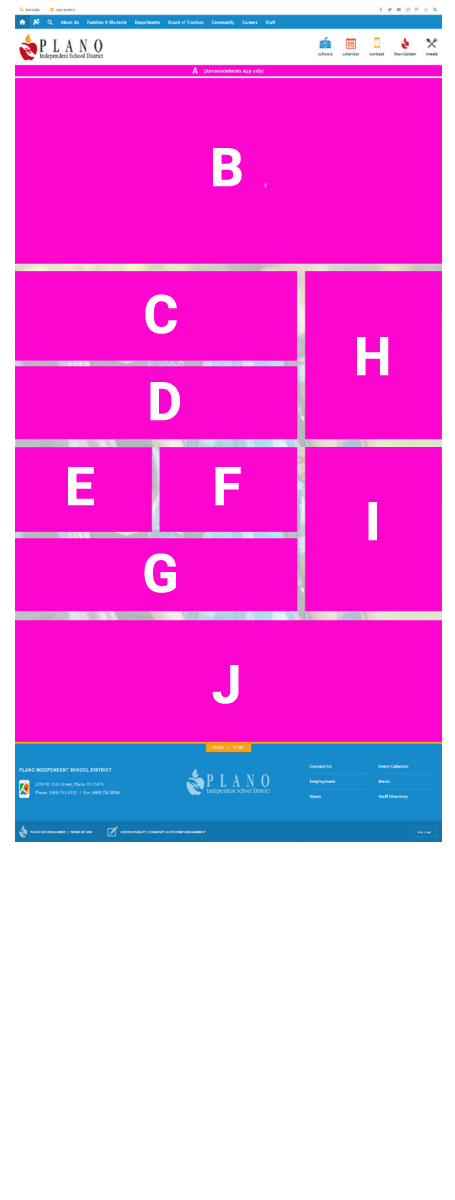
-
Images: Photo Editing Software
- Pixlr.com/Express - Free
- Canva.com - Free
- Fotor.com – Free
- Picmonkey.com – Free
- Photo Shop
- Photoshop Elements (Windows and Mac)
- Paint Shop Pro (Windows only)
- Pixelmator (Mac only)
- Affinity Photo (Mac Only)
**Plano ISD Communications and Instructional Technology do not provide technical support for photo editing.If you have trouble sizing or cropping images, we recommend Pixlr- On the Pixlr website, choose the Express program option.
- Click Browse and open your image.
- Click Adjustments, and then Resize.
- In the little box at the bottom put in your width (do not enter a height).
- Make sure the toggle for Keep Proportions is turned on (blue).
- Hit Apply.
- Click Crop and put in your image dimensions.
- Drag the box to the position on the photo that you think looks best.
- Hit Apply and then click Save.
- Now your image should be sized correctly and ready to upload into your photo gallery app
-
Images: Photo Release Information
Location:- TEAMS or Campus Portal - The school administrators & CTA will have access to this information.
There are three overarching questions to be asked before uploading a photo of student:
- Is it legal?
- Will the school support my decision?
- Is it likely that parents will support my decision?
-
Social Media - Facebook Feed Embed Code
Insert an Embed Code app on your page and copy and paste the following code in the app:
<div id="fb-root"></div>
<script>(function(d, s, id) {
var js, fjs = d.getElementsByTagName(s)[0];
if (d.getElementById(id)) return;
js = d.createElement(s); js.id = id;
js.src = "//connect.facebook.net/en_US/sdk.js#xfbml=1&version=v2.5";
fjs.parentNode.insertBefore(js, fjs);
}(document, 'script', 'facebook-jssdk'));</script>
<div class="fb-page" data-href="https://www.facebook.com/schoolname facebook account/" data-tabs="timeline" data-width="500" data-height="800" data-small-header="false" data-adapt-container-width="true" data-hide-cover="false" data-show-facepile="true"></div>Replace the bolded text above with your school social media handles without the @.
Important Note: Social media accounts need to show in the following order:
-
Social Media - Twitter Feed Embed Code
Insert an Embed Code app on your page and copy and paste the following code in the app:
<a class="twitter-timeline" data-width="560" data-height="800" data-dnt="true" data-link-color="#000066" href="https://twitter.com/{insert_twitter_handle}">Tweets by #####</a> <script async src="//platform.twitter.com/widgets.js" charset="utf-8"></script>
Replace the bolded text above with your school social media handles without the @.
Important Note: Social media accounts need to show in the following order:
-
Social Media - Instagram Embed Code
Insert an Embed Code app on your page and follow the instructions below:
- Home page app location:
- if school has all three social media accounts, place embed app in section I;
- if school only has 1 or 2 social media account, place embed app in section H).
- After you place the Embed app, named it: School Name - Social Media Type (example: Meadows Twitter)
- To get Instagram embed code:
- Go to your Instagram page and select the post that you want to feature.
- Open the post and click on the three dots in the upper right corner.
- Click embed.
- Copy embed code button.
- Go back to your embed code app
- Paste the embed code you copied from Instagram. Do not change the embed code copied from Instagram.
Since Instagram is not a live feed, it is recommended that you routinely change the post displayed. You do this by repeating steps 3-5 above.
Important Note: Social media accounts need to show in the following order:
- Home page app location:
-
Staff Directory: (PISD Custom)
A MiniBase configuration is the structure of your MiniBase. It includes Field Names, Filter Types, Sort Orders and Sort Levels. The configuration does not include the records in the MiniBase.
Here is how you import a MiniBase configuration.
- In Site Manager, navigate to the workspace where you wish to add the MiniBase.
- Click the Tools tab.
- Select MiniBase. The App Manager window displays.
- In the App Instances column, click Import Configuration.
- Click Browse and locate the MiniBase zip file containing the structure you wish to import.
- Click Import.
- Click I'm Done.
Tip: You can now populate the MiniBase with data manually or import records into it using a CSV file.Download the configuration file below -
Teacher Pages: Linking from Directory to Teacher Page
You will need the domain number or page number from each staff member's website. It will be found in the URL address bar on the teacher page. "https://www.pisd.edu/Domain/1469"
The bold item is the domain for a teacher’s individual page in the Faculty Pages channel. Paste the domain/### into the Link field in the Contact Directory
minibase app.Example:
Domain/1469 or Page/1200
Paste the code into the Links field in the Contact Directory mini-base app. Change the Domain number to correspond with the appropriate Teacher. Remember to Save changes.
'Easy' way to do this is to export your Contact Directory, paste the text into the Link column, make changes, save new directory (must be in CSV format). Purge the old directory (download and save a
back-up copy of the file first--keep it as CSV format), and import the new directory with the link codes. -
Teacher Pages: Moving from hidden to live
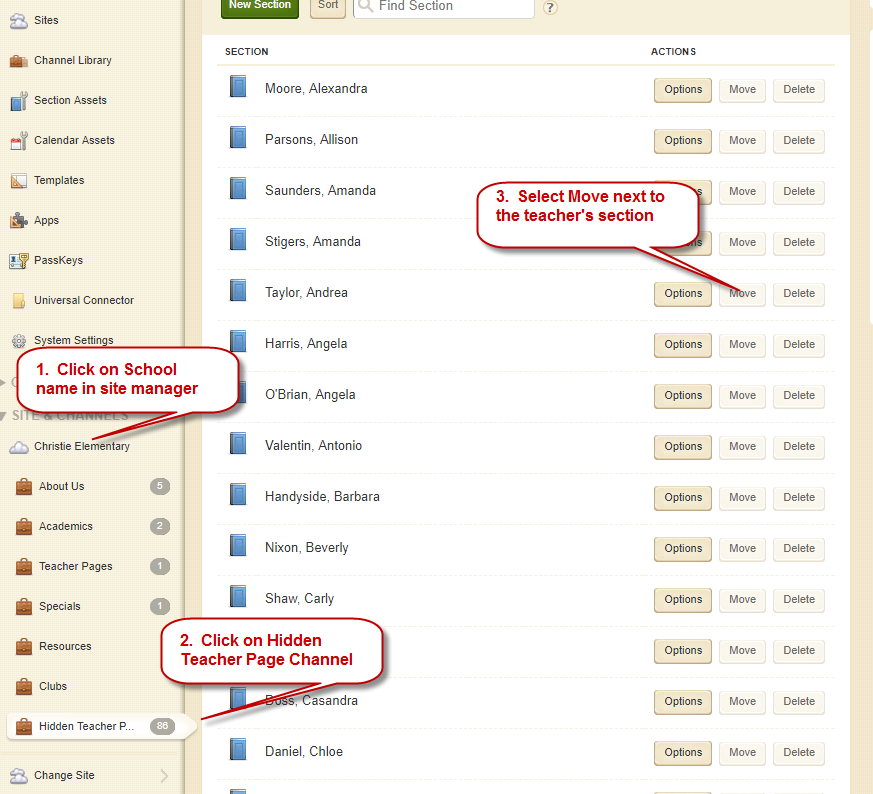
Moving pages from Hidden teacher page sections.
If you only need to move a few at a time, the method is described below. If you need to move over the entire hidden teacher page section, please email websupport@pisd.edu to request to move the entire channel.
- Click on School name in the site manager.
- Click on Hidden Teacher Page Channel
- Select Move button to move the teacher's section.
-
Teacher Pages: Delete Existing
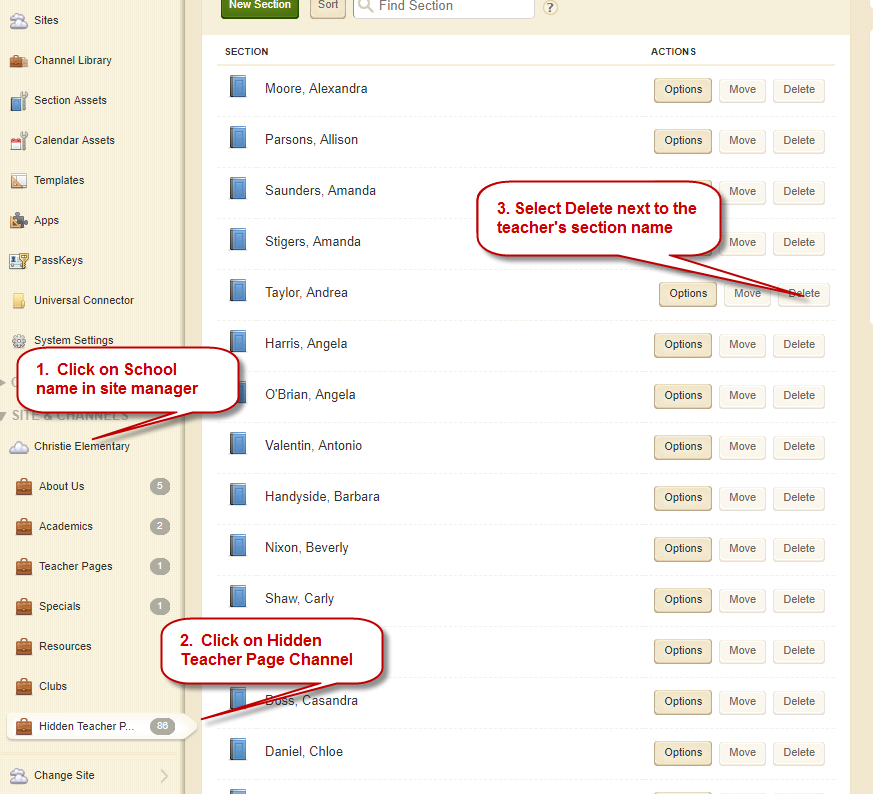
- Click on School name in site manager
- Click on Teacher Page Channel
- Select Delete net to the teacher section name.
\
-
Teachers / Staff Pages: Add New or Missing
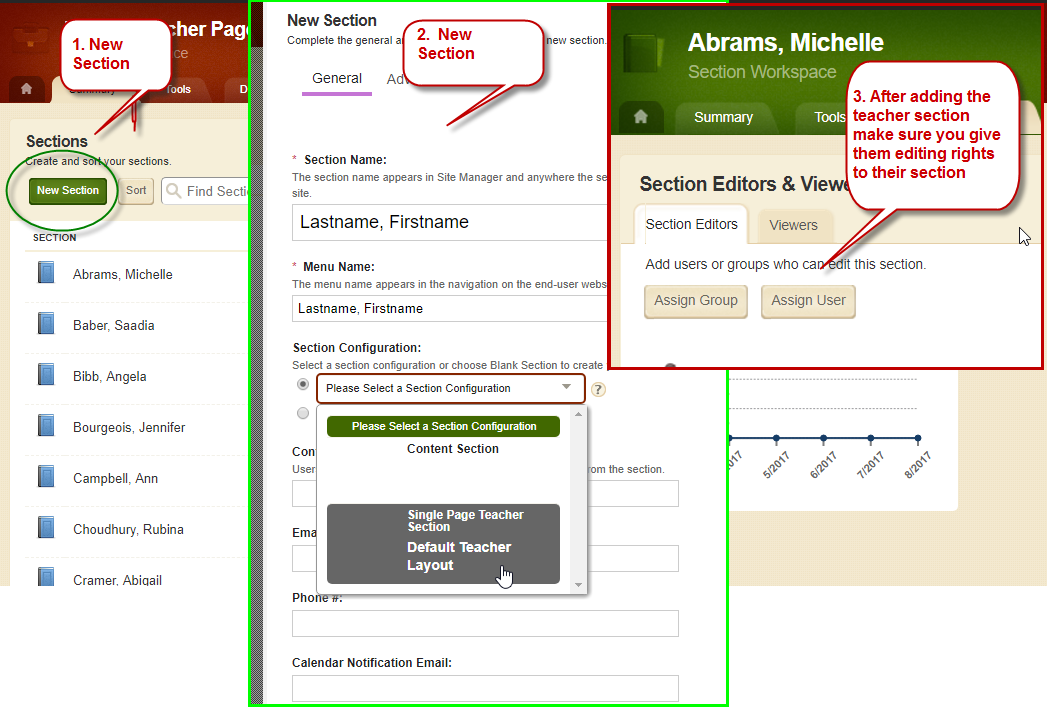
If you have missing teachers or staff on your teacher/faculty pages, you will need to create the sections manually.
From teacher/faculty page channel on the site manager:
- Select New Section Button
- On the New Section Window:
- Section Name: Enter the staff member name as lastname, firstname
- Section Configuration: Choose Single Page Teacher Section - Default Teacher Layout
- Click Save
- After adding the teacher section be sure to give them editing rights to their section.
- Select the teacher section
- Click on the editors and viewers tab
- On the section editors tab select assign user
- Search for the user by lastname or username
- Click select
- Click add
-
Website Accessible Colors
Hexadecimal Code
Color
Where Commonly Used
#135C81

Active Navigation Item Text Color
#156189

Region C Accent Color, Region D/E Accent Color
#168ACB

Section Dropdown Text Hover Color #1976A6

Channel Bar Background Color, Section Dropdown Text Hover Color, Region C App Name Bar Background Color, Region D/E App Name Bar Background Color, Default Link Color, Footer Background Color
#1EF81E

Editor Style Dark Accent Color
#21648C

Editor Style Dark Accent Color
#264867

/*dark blue*/
#2A665F

Editor Style Dark Accent Color
#31847A

Default Inside PISD Color
#335868

Inside PISD Channel Bar Background Color, App name, H1, H3, and H5
#335905

/*dark green*/
#337C74

#3B70A0

/*lighter blue*/
#3D787C

#417206

/*lighter green*/
#51445F

/*dark purple*/
#59712C

Region F Accent Color
#5A8206

Scroll Down Button Background Color/ Mystart Icon Color, Scroll To Top Background Color
#5C1700

/*dark red*/
#6E5C80

/*lighter purple*/
#7C9D3D

Region F App Name Bar Background Color
#862200

/*lighter red*/
#A0803D

#B45014

/*dark orange*/
#D36929

/*lighter orange*/
#E45A27

Region G App Name Bar Background Color and Accent Color
#E65722

BACKGROUND ONLY: Text on this background must be 18px (x-large) or larger. Editor Style Accent Color
#FAA21D

BACKGROUND USE ONLY: Text on this background must be BLACK. Scroll Down Button Background Color
#FBC243

BACKGROUND USE ONLY: Text on this background must be BLACK.


