Google (Classroom, Docs, Forms, etc.)
Page Navigation
- Google Chrome
- Google Calendar
- Google Certification & Training
- Google Chat
- Google Classroom
- Google Contact Group
- Google Docs/Drive
- Google Drawings
- Google Earth
- Google for Education Blog
- Google Forms
- Google Jamboard
- Google for Littles
- Google Meet
- Google My Maps
- Google Sheets
- Google Sites
- Google Sketchup
- Google Slides
- Google Translate
- Instructional Technology
- Google Contact Group
-
Creating a Google Contact Group
Creating a contact group in Google allows you to easily share G Suite items (Google Docs, Sheets, Classroom, etc.) with your colleagues by simply typing the group name rather than every recipient into the sharing field. In the steps below, you'll see how to copy an existing group of contacts from your Outlook and paste them into a Google contact group.
1. Open your Outlook mail where you have your group saved.
2. Start an email by entering the contact group’s name.
3. Click the small + sign to the left of the group name and click OK to expand the list.

5. Click anywhere inside the To: field. Press Ctrl+A to select All, then Ctrl+C to copy. All of the contacts in your group are now copied to your clipboard.
6. In Google Chrome, go to http://contacts.google.com.
7. On the left side near the bottom, click New Group.
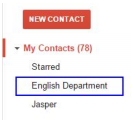
8. Give your Group a name (such as Matthews Staff or English Department) and click OK. Your new group now appears near the top left of the screen, under My Contacts.

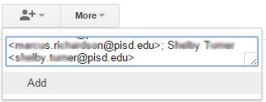
9. Click your new group name to open it. You will see the message "There are no contacts in this group." At the top, click the little person with the plus sign. Click inside the little box that appears and press Ctrl + V to paste all the names from the Outlook group. Click Add.

That's it! Now when you share your document, you can start typing the name of the Contact Group, select it, then share the doc as you normally would.


